Knitted-on edging and the Talmadge cloche

It's the first of June, it's pattern release day, so summer must be here.

The technique for June, the first of the summer projects within A Year of Techniques, is knitted-on edging, a common feature in shawls, blankets and so on. This month's pattern is the Talmadge Cloche, designed by Rosemary (Romi) Hill.

Read more

What we're working on now

The title is probably a bit misleading  since this is not about what we're doing business-wise, but what we've got on our needles.

I've stalled recently with my knitting - I just don't seem to be motivated to get anything out. So here's my sleeve and a bit of Jon from Lopi 31. It will keep me warm next winter, or maybe the one after that if I don't get a move on.

Jon - 1

In stark contrast, and despite the fact that we've been deep in editing (for what seems like months) of The Book of Haps, Jen has been madly casting on projects. 

Jen's Breezy Cardigan by Hannah Fettig, from Knitbot Essentials looks nearly finished. The neckband will take some time as it is so long. I'm sure it won't be long though. This is a project that's used some rather old Fyberspates Merino/Cashmere/Nylon in Jen's usual blue/green palette.

Breezy - 1

Before she's finished one cardigan, she's cast on another. This is Gudrun Johnston's Islay cardigan in Buachaille. If you look back to the last post, you'll find out a little more.

Islay - 1

While picking through the mound of project bags, I found this lone Pawkie from Kate Davies' Seven Skeins club. There's plenty of yarn left for the other and I'm sure this will come with us on holiday as it's a compact project.

Pawkie - 1

There is of course the inevitable sock project. This is one-and-a-bit Alfrick socks by Rachel Coopey in Lang Jawoll. These have steadily grown over the last few months and I'm sure will be ready well in advance of next autumn - particularly since Jen has fished them out for the Mason-Dixon One Sock Knitalong. Do you have a single sock lurking somewhere? Dig it out and join in.

Alfrick - 1

Finally, there's a super secret project that I can't show you. Yet. It's one of the haps from The Book of Haps that Jen couldn't help but cast on in Tosh Merino Light. Have a look at Jen's project pages once the book is published to see her progress.

Tosh Merino Light - 1

This won't be the last project from The Book of Haps that Jen wants to make. Join our Ravelry group to find out how she's getting on and to join the conversation about what's new and exciting in the knitting world.

Jim

Shetland Heritage Patterns - more news!

When I posted about the Shetland Heritage Fair Isle Jumper last week, eagle-eyed Felix spotted that the design was familiar to her. She pointed me towards Mary Jane Mucklestone's excellent 200 Fair Isle motifs, and sure enough, on page 35 there was a photo of a jumper that appeared to come from the same design!

How I wished I had seen that photo before I wrote the pattern for Jamieson & Smith... But all was not as simple as it at first seemed.

I was lucky enough to have worked with Mary Jane last year, when I edited her lovely hat and gloves for the Knit Real Shetland book, so I dropped her an email to ask her if she knew any more about this lovely Fair Isle jumper in the photo in her book. Despite being in the middle of deadlines and travelling, she was kind enough to email me straight back, to let me know that the photo was from the Shetland Museum Photo Archive. You can see the picture in question over on their website here: Fair Isle Allover Jumper in photo archive.

I was fascinated! On looking closely at the photo, it seemed clear that the design was the same. There are so many different Fair Isle motifs, all in exactly the same positions, that there was no chance that this was a coincidence. However, it was also clearly not a photo of the same jumper before it was worn and cut into pieces... If you look closely at the motifs on the bottom band, you can see that in the cut up jumper I worked on in the archives, the motifs are unsymmetrical and "incorrect", whereas those in the jumper in the photo are correct. I speculated all sorts of explanations for the design similarities!

I fired off an email to Carol Christiansen at the Shetland Museum and Archives, to ask her if she knew anything about the Fair Isle jumper in their photo archive. I received this information in response:

The jumper in the photo of SM01003 is a replica of the one in pieces that you looked at (TEX 8943).  We went through a period in the 1990s of having replicas made of some items in the collection, so they could be used for handling, etc. but they were never exact replicas, using modern yarns in colours that were available at the time.  The replica was hand-knit in 1993 of machine-made yarn and the knitter ‘corrected mistakes’ she felt had been made in the original.  

So the photo is of a new garment knitted from the cut-up jumper in pieces that I worked from in the summer. It is interesting to see where the new photo-archive garment, and the new pattern I've written differ - I think that most of the differences come from the fact that I was writing instructions that had to work as a printed pattern for other knitters, whereas the knitter in the 90s was just making a one-off piece. The charts would have been even more enormous if I had kept to the arrangement of different motifs on front and back!

In related-news, Jamieson & Smith have released the kit for the Fair Isle Cap that I worked on at the same time. This is also a pattern written from an item in the archives.

That's a slightly bonkers-looking picture of me modelling it, when we were at J&S in October! It's knitted with a full lining, so there are 4 layers of fabric keeping your ears warm! Perfect for the icy cold weather we've had this week.

Here's a more sensible flat photo of it, so that you can see the lovely motifs incorporated:

Fair Isle Cap
© Jamieson & Smith

This hat also has a bit of story behind it, as it was purchased on eBay and donated to the Museum by Masami Yokoyama (designer of the delightful tea-themed tea cosy in Knit Real Shetland). It's a 19th Century hat, that was most-likely a fisherman's hat, designed and worn for work (unlike the jumper which was more of a fashion item). You can read more about how it was discovered and donated over on the Visit Shetland website here: Fair Isle Cap donated by Wool Week eBayer

As with the jumper, I've had to make some adjustments from the original artefact. The motifs were incomplete and confused up the back of the hat, as you can see below:

Fair Isle Cap2

And the folded-up brim was just left curling over. In fact, the brim appears to have been knitted at a different time to the rest of the cap, as the colours are not quite the same, and the yarns slightly different. Carol advised me that this was likely to have originally had a knitted lining, so that was the construction that I used in the new pattern.

Fair Isle Cap1
You can see the Fair Isle stranding poking over the top of the curled brim. There are pattern pages on Ravelry for both the jumper and hat: Shetland Museum and Archive designs

And both can be purchased as kits from Jamieson & Smith.

Happy knitting!

Drawing knitwear schematics in Illustrator: Part 2

Last week's post covered setting up your preferences and layers in Illustrator. In this post, I will cover drawing basic outline shapes, then I will do a post on finishing off the schematic, covering things like adding curves and alignment.

I like to draw schematics from an overhead flat shot of the garment. It means that the drawing will give a good impression of the shape of the piece, without having to spend ages drawing lines to scale from measurements. To get a good outline photo, make sure that you take the picture from directly overhead. The garment in the example below is the Droplet Bolero from A Stitch in Time vol 2.

If you can't find one of the palettes I refer to, look for it in the Window menu, and once it is open, you can drag and drop it onto the right hand side of the screen.

The image will be built from the bottom upwards, starting with the main outline of the piece (details like front openings or front neckline can be added later).

Unlock your bottom layer (in my case it is called Scan) by clicking on the padlock icon on the Layers palette. Click on the layer so that it is highlighted in blue, and therefore active. Then choose Place... from the File menu and select the image file for the photograph you wish to use.

Use the black arrow (the Selection Tool) to resize the photograph. Holding down shift while you do so will ensure that the proportions of the picture are retained. If you also hold down the alt key, then the photo will stay centred in the same place. Resize the photograph so that it sits comfortably on the artboard, with space around it for arrows and measurements.

Once you are happy with the size, then lock the Scan layer. Now you won't be able to move the photograph by mistake. If you need to adjust it later, you will simply need to unlock the layer again before making any changes.

Now unlock the layer where you plan to draw the outline shape of the garment. Click on the layer so that it is highlighted in blue. Make at this point that you have selected Snap to Grid in the View menu.

Then choose the Rectangle tool from the palette of options on the left of the screen. If you can't see a plain rectangle, the it might be hiding underneath one of the other shape tools (ellipse, polygon, star, rounded rectangle etc...). Just click and hold on the tool button to see the other options and select the rectangle tool.

Draw a rectangle over the body of your garment.

Then select the fill by making sure that the filled box is to the front on the toggle on the left-hand side of the screen.

And choose a fill colour from the Swatch palette (or use the Colour palette if you want more control of the exact shade). I usually fill the outline shape with white. This means that if your schematic is placed onto a coloured section of page, the outline shape will have a white background. If you have no fill (the red slash through a white box), then the schematic will have the same background colour as whatever it is placed over.

Then click on the stroke toggle, so that the outlined square comes to the front.

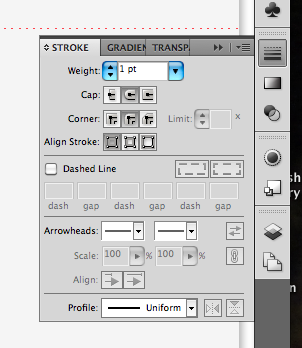
You can now choose the outline for your schematic. You select the colour you want from either the Swatch or Colour palettes as before. Then you also need to select how thick your outline line will be, and whether it will have sharp or rounded corners. You make these choices on the Stroke palette (the button with different types of horizontal line) on the right-hand side of the screen.

I use a 1 pt line thickness with rounded corners and ends. Play around with the options to see what effects you like best.

To make the outline into your desired shape, you will need to add some more anchor points (unless you want to draw a schematic of a rectangle of course). Anchor points are the handles at the corners of your shape, and by adding more, you can make a more complex shape. Make sure that your rectangle is selected and you can see the selection outline and small square handles at the corners (in the picture above, showing the rectangle, these are shown in blue). Choose the Add Anchor Point tool from the tools on the left of the screen. It may be hidden under the Anchor Point tool, in which case click and hold to choose from the other options available. The tool looks like a fountain pen with a small plus sign beside it.

Use this tool to click on the outline shape to add points whereever you will want to put a corner in your shape. Add more than you think you will need as you can always subtract them later.

Then use the white arrow (Direct Selection tool) to select and move the new anchor points. In doing so you can start to create the shape that you require.

Continue to add anchor points and then move them until you are ready to fine-tune the shape. You may find it easier at this point to temporarily remove the fill from your shape, so that you can see the photograph below more clearly.

Having created the rough overall shape of the piece, we can now tweak it to ensure that elements are lined up correctly with each other. I will cover adding curves to the shape in the next post.

To check that your neckline is in the centre of the piece (assuming that it should be!), add some guides to the workspace. Guides are lines that won't appear in the final schematic and are just used to line things up.

Ensure that your rulers are visible at the top and left of your workspace. You can make them visible from the View menu. By clicking and dragging from the ruler, you can add guide lines to line up with elements such as the side seams, shoulder line, back neck or underarm. The guides below are shown in turquoise, with the selected guide appearing blue. 

When you select two guides, you can then see how far apart they are by clicking on Transform at the top of the workspace. In the example below, the two guides are 21 pt apart.

To make sure that the back neck is correctly centred, I will need to add another guide to the picture, that is 21 pt to the left of the right side seam (as we are looking at the diagram) guide. Select the guide at the right side seam. Press Shift+Cmd+M (or Shift+Control+M if you are using a PC) to bring up the move dialogue box, and select a horizontal move of -21 pt. For horizontal movement: negative numbers move objects the the left, positive numbers move to the right. And for vertical movement negative numbers move objects up and positive numbers move objects down (that confused me for a while!). Rather than clicking OK (which would move the selected guide), you can click on Copy, which will add another guide at the selected distance.

With a new guide added, you can then move the anchor point for the back neck so that it lines up with the guide. This ensures that your back neck is centred.

You can also add guides so that you can add anchor points at the same height on each side of the piece. Since Snap to Grid has been selected, all of the guides and anchor points should automatically be snapping to points 1 pt apart. In this way they will line up neatly.

The horizontal guide above has been added to show the end of the edging at the bottom of the bolero. Anchor points are added to the outline, in line with the guide, at both sides of the shape.

Once you are happy with the shape and placement of the corners of the piece, you can get rid of all of the guides by selecting Guides from the View menu, and then choosing the Hide Guides option. You may need them later when adding arrows, so it's best not to clear them at this stage.

You should now have a basic outline shape, ready to add curves and details.